Building a Twelve Factor App
18 Oct 2016

I’ve spent most of my career writing and architecting large bespoke Java implementation for Banks. This used to involve a large tech stack involving application servers (IBM WebSphere), databases (Oracle DB), caching (Coherence) and interoperability (IBM Message Queue and Message Broker)……Eugh!! That’s the way it was for a lot of enterprises, and it still is now. However, the last few years I have been concentrating on Deployment Automation, Configuration Management and talking about all things DevOps. As part of my work, I often talk to customers about how they can re-design and re-architect their solutions to adapt to this new world of IT. Designing systems with service oriented architectures or micro-service architectures are key, but also too are designing the ability to automate the deployment and monitor the health of the system. These are all properties that are encompassed in the twelve-factor app methodology.
I decided that rather than talking about the theory I would go ahead and build one. This blog explains the journey and the learning experience I have followed in creating this app and hopefully it will be useful for you, the reader, to understand what is required to build such an application.
Let’s look at the properties of a twelve factor application and see how I can apply this to my application.
-
Codebase - One codebase tracked in revision control, many deploys. Use a source repository such as Git to store the application code base to track all the changes and deploys of the code to the environments. A deploy is a running instance of the code. With my application, I am using GitHub as the code repository. I could have used Stash, BitBucket or even SVN, better decided on the free and widely adopted solution.
-
Dependencies - Explicitly declare and isolate dependencies. My application is written in Java and I am using Maven as the dependency management tool to explicitly declare all the application Jar files within the application
pom.xmlfile. Using Maven, I pin specific versions of the dependencies to the application, ensuring consistency in the build. There are many dependency management tools to choose from depending on your language of choice, Maven, Gradle and Ivy for (Java), Bundle and Gemfiles for Ruby and Godep and Godm for Golang. I could have written my app in any language but I chose Java with Maven as it’s what I’m familiar with. -
Configuration - Store configuration in the environment. A twelve factor app requires a strict separation of configuration from the code. Instead of hard-coding configuration into the application this needs to be externalised into environment variables. In my application I could have used environment variables, but I have externalised configuration into Consul and Vault. Consul is a distributed tool used for service discovery, health checking and dynamic configuration. Vault is a distributed tool used for secrets management, where I store the application passwords.
-
Backing Services - Treat backing services as attached resources. A backing service such as an MySQL DB should be able to be swapped out without any changes to the code. My application does not (yet) have a backing service. However, by using Vault, I can store the application connection details there and dynamically attach to a new DB each time the application loads. Note: this feature will be in later version of my code.
-
Build, Release, Run - Strictly separate build and run stages. The build stage builds the binaries, the release stage combines the environment configuration with the deployment run configurations and the run stage runs the app in the execution environment. In my solution I build the code with Maven and store the Jar artefact into an AWS S3 bucket. When I provision the environment I pull down the artefact and environment configuration and then I use an Upstart service to launch the application in its runtime. Every release must have a unique release ID. In my application the version is defined by Maven which uses the standard versioning system of developing with
1.0.0-SNAPSHOTversions and then releasing with1.0.0versions. -
Processes - Execute the app as one or more stateless processes. Twelve factor applications are stateless and share nothing. Data must be stored to a stateful backing service such as a database. As stated previously, there is no database…yet. So very much so this application is stateless.
-
Port Binding - Export services via port binding. A twelve-factor app is completely self-contained and does not require runtime injection of a web server into the execution environment. The application should expose HTTP as a service and bind to that port to expose its services on. This example uses Java SpringBoot, which makes it easy to create application the ‘just run’. It has an embedded web server (Tomcat in this case) and I just expose the port to bind HTTP requests from within the configuration file.
-
Concurrency - Scale out via the process model. The application must run one and only one process on the operating system. The application runs in a Java virtual machine which uses threads under the hood to hide away the Unix process. The JVM does block system resources on start-up but this can be configured to meet the requirements of the application (such as JVM heap size). My application uses the OS process manager Upstart to manage its process, output streams and restarts and shutdowns. You could create different Upstart configurations to run this app concurrently on one host, by assigning different ports to use. In the future I plan to use Nomad to schedule the deployment of the application to different nodes within a cluster. Although I could just as easily use Heroku, Pivitol, Docker or OpenShift to do this.
-
Disposability - Maximise robustness with fast start-up and graceful shutdown. The application should be disposable, which means it can be shut-down and restarted at a moment’s notice. Therefore, the application must be designed to handle graceful shutdowns and ensure in-flight requests are handled correctly and no more HTTP requests are processed. The SpringBoot framework has a module called
[Actuator](https://spring.io/guides/gs/actuator-service/)which allows you to shutdown the application gracefully. -
Dev/Prod Parity - Keep development, staging and production as similar as possible. The twelve factor application is designed for continuous deployment by keeping the gap between development and production small. Currently I only have one environment, however I am using Packer and Terraform to provision my environment therefore the infrastructure is defined as code and therefore there would be parity between the different environments.
-
Logs - Treat logs as an event stream. Each application process should write its event stream, unbuffered, to
stdout. The execution environment should capture the stream and route the stream to the final destination. By using the Upstart service, the process stream is routed to the log file destination and it is responsible for the location of the stream. -
Admin Processes - Run admin/management tasks as one-off processes. The twelve-factor application should provide one-off management processes to be run in the same execution environment. My application does not yet have any admin processes, however the Actuator module allows for remote execution of management tasks such as health, restart, shutdown, etc.
That’s the theory now let’s see how I developed the application….? All the code in this example can be found in my GitHub repository.
The first thing I defined was the application dependencies. This includes all the SpringBoot and Spring Vault dependencies that are required for my application. I chose SpringBoot as the Java framework as I am familiar with Spring and it allows you to build Java Web applications without the need for an external Web Server. Tomcat is embedded, via the dependencies, and it has the ability to provide production-ready features such as metrics, health checks and externalized configuration. I followed the Spring Boot guides here to help me defined this application: SpringBoot Docs.
<dependencies>
    <dependency>
        <groupId>org.springframework.cloud</groupId>
        <artifactId>spring-cloud-vault-starter-config</artifactId>
        <version>1.0.0.BUILD-SNAPSHOT</version>
    </dependency>
    <dependency>
        <groupId>org.springframework.boot</groupId>
        <artifactId>spring-boot-starter</artifactId>
        <version>2.0.0.BUILD-SNAPSHOT</version>
        <exclusions>
            <exclusion>
                <groupId>commons-logging</groupId>
                <artifactId>commons-logging</artifactId>
            </exclusion>
        </exclusions>
    </dependency>
    <dependency>
        <groupId>org.springframework.boot</groupId>
        <artifactId>spring-boot-starter-tomcat</artifactId>
        <version>2.0.0.BUILD-SNAPSHOT</version>
    </dependency>
    <dependency>
        <groupId>org.springframework</groupId>
        <artifactId>spring-webmvc</artifactId>
        <version>4.3.3.RELEASE</version>
    </dependency>
    <dependency>
        <groupId>org.springframework.boot</groupId>
        <artifactId>spring-boot-starter-test</artifactId>
        <scope>test</scope>
        <version>2.0.0.BUILD-SNAPSHOT</version>
        <exclusions>
            <exclusion>
                <groupId>commons-logging</groupId>
                <artifactId>commons-logging</artifactId>
            </exclusion>
        </exclusions>
    </dependency>
    <!-- https://mvnrepository.com/artifact/org.springframework/spring-beans -->
    <dependency>
        <groupId>org.springframework</groupId>
        <artifactId>spring-beans</artifactId>
        <version>4.3.3.RELEASE</version>
    </dependency>
    <!-- https://mvnrepository.com/artifact/org.springframework/spring-context -->
    <dependency>
        <groupId>org.springframework</groupId>
        <artifactId>spring-context</artifactId>
        <version>4.3.3.RELEASE</version>
    </dependency>
    <!-- https://mvnrepository.com/artifact/org.springframework/spring-web -->
    <dependency>
        <groupId>org.springframework</groupId>
        <artifactId>spring-web</artifactId>
        <version>4.3.3.RELEASE</version>
    </dependency>
    <!-- https://mvnrepository.com/artifact/org.springframework.boot/spring-boot-actuator -->
    <dependency>
        <groupId>org.springframework.boot</groupId>
        <artifactId>spring-boot-actuator</artifactId>
        <version>1.4.1.RELEASE</version>
    </dependency>
</dependencies>
Next I had to define my application configuration file (application.properties) this is externalised from the application and not built into the Jar file. The application knows where to load this configuration from by use of the command line argument --spring.config.location=<Path to directory of config files>. The application configuration includes which port to bind HTTP to and which port to expose the management endpoints to.
server.compression.enabled: true
server.compression.min-response-size: 1
server.port: 8090
management.port: 8091
management.address: 127.0.0.1
info.app.name: Twelve Factor Demo Application
info.app.description: This is my 12 factor app
info.app.version: 1.0.0
The bootstrap configuration file (bootstrap.properties) contains the information required to connect to my Vault Server to retrieve the application secrets, such as passwords and database connections.
spring.application.name: hashiapp-demo
spring.cloud.vault.host: <REDACTED>
spring.cloud.vault.port: 8200
spring.cloud.vault.scheme: http
spring.cloud.vault.token: <REDACTED>
spring.cloud.vault.connection-timeout: 5000
spring.cloud.vault.read-timeout: 15000
spring.cloud.vault.config.order: -10
Once the configuration is defined, I can then create my first SpringBoot application. Note the logging statements which shows when the application starts and stops. This is important that the application outputs all its the events and I do not define where to stream the events to. Later when I define the Upstart service configuration I direct this stream to a file on disk. SpringBoot also allows you to define logging levels and what to log.
import javax.servlet.ServletContextEvent;
import javax.servlet.ServletContextListener;

import org.apache.commons.logging.Log;
import org.apache.commons.logging.LogFactory;
import org.springframework.boot.SpringApplication;
import org.springframework.boot.autoconfigure.EnableAutoConfiguration;
import org.springframework.boot.autoconfigure.SpringBootApplication;
import org.springframework.context.annotation.Bean;
import org.springframework.context.annotation.ComponentScan;
import org.springframework.context.annotation.Configuration;

@SpringBootApplication
@Configuration
@ComponentScan
@EnableAutoConfiguration
public class MyApp {

    private static Log logger = LogFactory.getLog(MyApp.class);

    @Bean
    protected ServletContextListener listener() {
        return new ServletContextListener() {
            public void contextInitialized(ServletContextEvent sce) {
                logger.info("Starting MyApp application...");
            }

            public void contextDestroyed(ServletContextEvent sce) {
                logger.info("MyApp application destroyed");
            }
        };
    }

    public static void main(String[] args) throws Exception {
        SpringApplication.run(MyApp.class, args);
    }
}
Next I need to expose an endpoint, in this instance ‘/vault’, which returns the secret stored in Vault. The password value is automagically inserted into the application, using dependency injection, based on the configuration information in the bootstrap.properties file. The file is used to go to Vault to retrieve that value on application start-up. I followed this Spring Boot Vault Blog to understand how to configure this integration. This value could just as easily be a connection string to a database. In later iterations of this project I will use Vault to store the database credentials and then generate dynamic credentials that the application can use to access the database.
import org.apache.commons.logging.Log;
import org.apache.commons.logging.LogFactory;
import org.springframework.beans.factory.annotation.Value;
import org.springframework.web.bind.annotation.RequestMapping;
import org.springframework.web.bind.annotation.RestController;

@RestController
class VaultController {
    private static Log logger = LogFactory.getLog(VaultController.class);

    @Value("${password}")
    String password;

    @RequestMapping("/vault")
    public String getSecret() {
        return "Vault secret : " + password + "\n";
    }
}
This endpoint will be served from this URL: http://localhost:8090/vault. The output would look something like this:
‘Vault secret : MyS3cr3tP@ssw0rd’
The last part of the application code is to expose the health of the application using Actuator management endpoints. Actuators enable production-ready features to a Spring Boot application without having to build the features yourself. They’re mainly used to expose different types of information about the running application – health, metrics, info, dump, env etc. While these are no replacement for a production ready monitoring solution – they’re a very good starting point. The setting above management.port states that this endpoint will be bound to the port 8081. This endpoint will display whether the application environment has enough disk space and will report accordingly.
import java.io.IOException;
import java.nio.file.FileStore;
import java.nio.file.Files;
import java.nio.file.Paths;

import org.springframework.beans.factory.annotation.Autowired;
import org.springframework.beans.factory.annotation.Value;
import org.springframework.boot.actuate.health.AbstractHealthIndicator;
import org.springframework.boot.actuate.health.Health;
import org.springframework.stereotype.Component;

@Component
public class DiskSpaceHealthIndicator extends AbstractHealthIndicator {

    private final FileStore fileStore;
    private final long thresholdBytes;

    @Autowired
    public DiskSpaceHealthIndicator(@Value("${health.filestore.path:${user.dir}}") String path,
                                    @Value("${health.filestore.threshold.bytes:10485760}") long thresholdBytes) throws IOException {
        fileStore = Files.getFileStore(Paths.get(path));
        this.thresholdBytes = thresholdBytes;
    }

    @Override
    protected void doHealthCheck(Health.Builder builder) throws Exception {
        long diskFreeInBytes = fileStore.getUnallocatedSpace();
        if (diskFreeInBytes >= thresholdBytes) {
            builder.up();
        } else {
            builder.down();
        }
        long totalSpaceInBytes = fileStore.getTotalSpace();
        builder.withDetail("disk.free", diskFreeInBytes);
        builder.withDetail("disk.total", totalSpaceInBytes);
    }
}
This endpoint will be served from this URL: http://localhost:8091/health. Later in the blog series I will show how we can register this service with Consul to monitor the health of this application. The output of this endpoint would look something like this:
{
    "status":"UP",
    "customHealthCheck":{ "status":"UP"},
    "diskSpace":{"status":"UP","disk.free":62681706496,"disk.total":499071844352},
    "refreshScope":{"status":"UP"},
    "vault":{"status":"UP"}
}
The Actuator framework also exposes the info endpoint http://localhost:8091/info which will return information from the application.properties file to an output like this:
{
    "App":{
        "description":"This is my 12 factor app",
        "name":"Twelve Factor Demo Application",
        "version":"1.0.0"
    }
}
With the base application code written, I now need to build the application and deploy the artefact into the artefact repository, in this case and AWS S3 bucket. To do this I use Maven and I have configured it to use AWS S3 as the repository to store the resulting Jar file to. The maven pom.xml file and the maven settings files need to be configured to point to my AWS account. I followed this guide to an S3 repository for Maven to set this integration up.
<distributionManagement>
    <snapshotRepository>
        <id>myapp-demo</id>
        <url>s3://myapp-demo/snapshot</url>
        <uniqueVersion>false</uniqueVersion>
    </snapshotRepository>
    <repository>
        <id>myapp-demo</id>
        <url>s3://my app-demo/release</url>
        <uniqueVersion>false</uniqueVersion>
    </repository>
</distributionManagement>
With this integration setup, when I run the command mvn clean install deploy it will compile the code, build the Jar file and upload the artefact to the S3 bucket. I can then use a bit of bash scripting magic to get the the values in the pom.xml file to work out the URL the artefact can be downloaded from once it is built.
echo "Started: $(date)"
echo "Compiling Application and Generating WAR file and uploading to AWS s3"
mvn clean install deploy

export AWS_REGION="us-west-2"
export VERSION=$(mvn org.apache.maven.plugins:maven-help-plugin:2.1.1:evaluate -Dexpression=project.version | grep -v '\[')
export GROUP_ID=$(mvn org.apache.maven.plugins:maven-help-plugin:2.1.1:evaluate -Dexpression=project.groupId | grep -v '\[' | sed s@[.]@/@g)
export ARTIFACT_ID=$(mvn org.apache.maven.plugins:maven-help-plugin:2.1.1:evaluate -Dexpression=project.artifactId | grep -v '\[')
export PACKAGING=$(mvn org.apache.maven.plugins:maven-help-plugin:2.1.1:evaluate -Dexpression=project.packaging | grep -v '\[')
export URL="https://s3-${AWS_REGION}.amazonaws.com/${ARTIFACT_ID}/release/${GROUP_ID}/${ARTIFACT_ID}/${VERSION}/${ARTIFACT_ID}-${VERSION}.${PACKAGING}"
echo "Artifact URL ${URL}..."]
echo "Finished: $(date)"
That’s the artefact built and uploaded to the repository, I need to write the Ubuntu Upstart script run the application in the execution environment, in this case Ubuntu. This is a templated script that requires a few parameters to be set when its interpolated on the filesystem:
app_install_path, the location to store the application and its configuration.app_download_url, so it can use curl to download the artefact from the S3 bucket.app_port, so it know which port to bind HTTP requests to.consul_ip, so it can get the Vault token.- `vault_app_name’, so it can get the application secrets from the Vault server.
This Upstart script will download the application from the S3 bucket and write the environmental specific configuration the first time it is run. It then runs the application and streams the application log files to the file /var/logs/javaapp.log. When this Upstart script is in place (/etc/init/javaapp.conf) the application can be started with the command sudo start javaapp and hey presto we have a working simple ‘almost’ twelve factor app.
description "My Demo Java Application"
start on runlevel [2345]
stop on runlevel [!2345]
respawn
script
if [ ! -f ${app_install_path}/my-app-demo.jar ]; then
echo "Downloading Java app..."
sudo mkdir -p ${app_install_path}
sudo curl -L "${app_download_url}" > /tmp/my-app-demo.jar
sudo mv /tmp/my-app-demo.jar ${app_install_path}/my-app-demo.jar
sudo chown root:root ${app_install_path}/my-app-demo.jar
sudo chmod 0644 ${app_install_path}/my-app-demo.jar
cat << EOF | sudo tee ${app_install_path}/application.properties
server.compression.enabled: true
server.compression.min-response-size: 1
server.port = ${app_port}
management.port: 8091
management.address: 127.0.0.1
Info.app.name: SpringBoot Demo Application
Info.app.description: This is my first spring boot application
Info.app.version: 1.0.0
EOF
sudo chown root:root ${app_install_path}/application.properties
sudo chmod 0644 ${app_install_path}/application.properties
export VAULT_TOKEN=$(curl -sf "http://${consul_ip}:8500/v1/kv/service/vault/root-token?raw")
cat << EOF | sudo tee ${app_install_path}/bootstrap.properties
spring.application.name: ${vault_app_name}
spring.cloud.vault.host: ${consul_ip}
spring.cloud.vault.port: 8200
spring.cloud.vault.scheme: http
spring.cloud.vault.token: $${VAULT_TOKEN}
spring.cloud.vault.connection-timeout: 5000
spring.cloud.vault.read-timeout: 15000
spring.cloud.vault.config.order: -10
EOF
sudo chown root:root ${app_install_path}/bootstrap.properties
sudo chmod 0644 ${app_install_path}/bootstrap.properties
fi
exec /usr/bin/java -jar ${app_install_path}/my-app-demo.jar --spring.config.location=${app_install_path}/ >>/var/log/java_app.log 2>&1
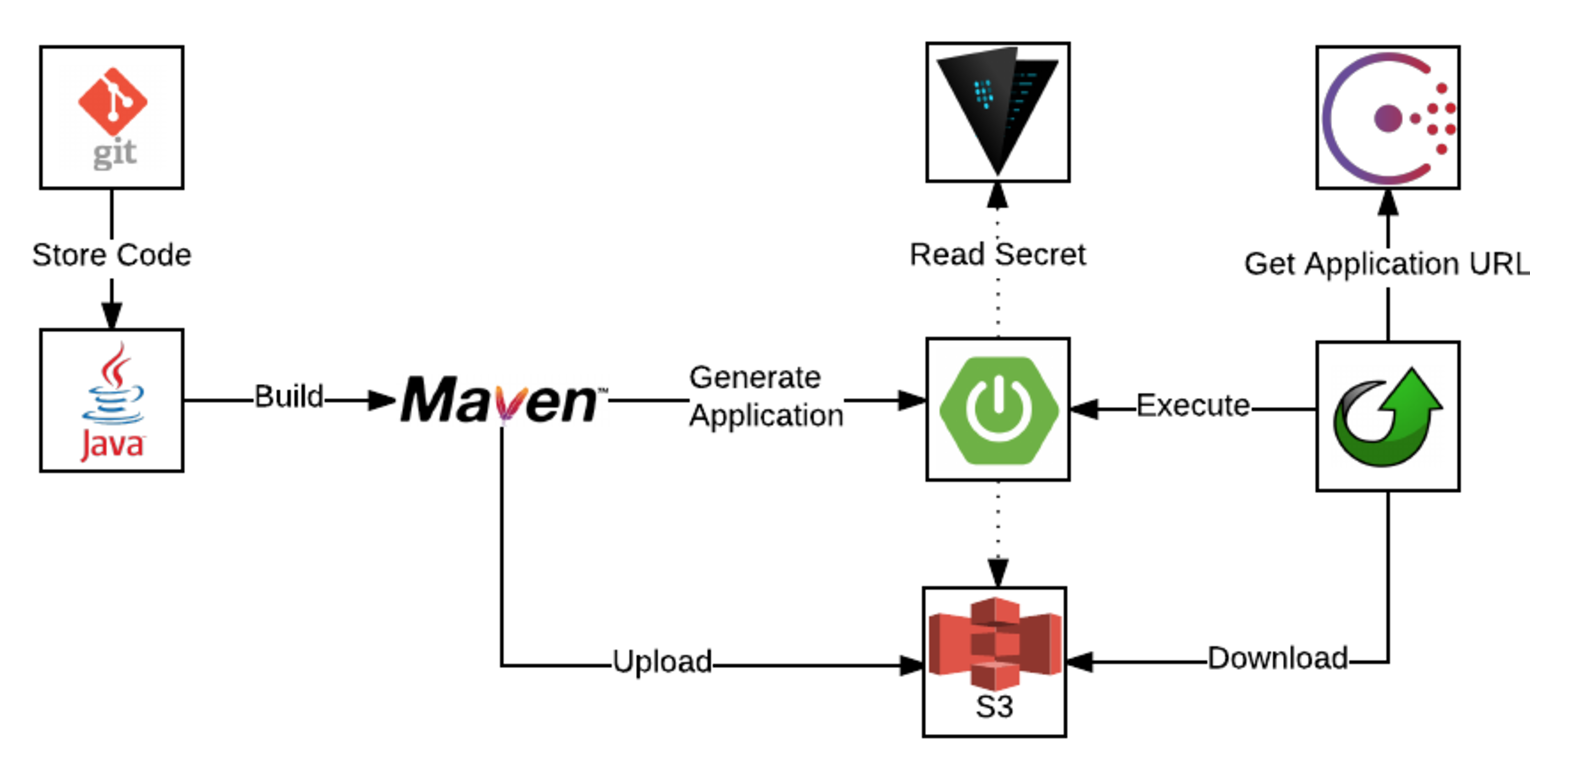
end scriptTo conclude, this application uses many practices of the twelve-factor app methodology to make it simple to build, deploy and monitor using a number of interesting technologies. The source code is stored in Git, the Java application is built using Maven and gets its secrets from Vault and the resulting application is uploaded to an S3 repository. The execution environment uses Consul to get the application URL, which is then downloaded from the S3 repository and executed using Upstart.
In the next instalment of this blog I will explain how I have used Packer and Terraform to build out the runtime environments, which include a Consul and Vault server cluster and the client servers which host the application.
This application is a work in progress and I’d love you to take a look, learn from it, or even better, tell me how I can improve this application to truly show off the principles of a twelve-factor application. All suggestions welcome, apart from suggesting to rewrite it to a newer ‘cooler’ language like Golang or Rust…. ;P